Welcome to the world of precision vegetable preparation! As the Admin of ReviewAW.com, with over a decade of hands-on experience in kitchen gadgets, I can tell you that few tools offer the same blend of efficiency and elegance as a high-quality julienne peeler. If you’ve ever admired those delicate, uniform carrot strings in gourmet salads or stir-fries and wondered how to achieve them at home, you’re in the right place. Today, we’re diving deep into the art of using a julienne peeler, focusing specifically on transforming humble carrots into culinary masterpieces. Forget tedious knife work or bulky mandolines; mastering this simple tool will elevate your dishes and streamline your meal prep, giving you consistent, beautiful results every time.
Understanding the Julienne Peeler
Before we get started, let’s clarify what a julienne peeler is and why it’s a kitchen essential. Unlike a standard vegetable peeler, which features a single, smooth blade designed to remove skin, a julienne peeler boasts a serrated blade with small, sharp teeth. These teeth are precisely spaced to cut thin, matchstick-like strips of firm vegetables and fruits, rather than simply peeling off a flat layer.
The beauty of a julienne peeler lies in its simplicity and effectiveness. It allows you to create uniform strips quickly and with minimal effort, far surpassing the speed and consistency achievable with even the sharpest chef’s knife. For home cooks and culinary enthusiasts alike, it bridges the gap between basic peeling and intricate knife skills, offering a safe and efficient way to add texture and visual appeal to your meals. Whether you’re aiming for a professional-looking garnish or uniform pieces for even cooking, this specialized peeler is your secret weapon.
Preparing Your Carrots for Julienne Perfection
Achieving those picture-perfect carrot strings starts with proper preparation. The right technique combined with a good peeler will make all the difference.
First, select the right carrots. Look for firm, straight carrots of medium to large size. Carrots that are too thin can be difficult to grip and yield very short strips, while overly crooked ones can make the peeling process inconsistent. Wash your carrots thoroughly under cold running water to remove any dirt.
Next, peel the carrots with a standard vegetable peeler. While a julienne peeler can remove the outermost layer, its primary purpose is to create strips from the peeled surface. Using a regular peeler first ensures a clean, smooth surface, free of blemishes, which allows the julienne peeler to glide effortlessly and produce unblemished strings.
Finally, for optimal stability and safety, consider creating a flat base. Many chefs recommend slicing a thin strip lengthwise off one side of your peeled carrot. This flat surface prevents the carrot from rolling around on your cutting board, giving you greater control and reducing the risk of accidents during the julienning process. This small step can significantly enhance both the quality of your strips and your confidence.
Step-by-Step Guide: How to Use a Julienne Peeler for Carrot Strings
Now that your carrots are prepped, it’s time for the main event. Follow these simple steps to create exquisite carrot strings:
-
Secure Your Carrot: Place the peeled carrot flat-side down on a stable cutting board. If you didn’t create a flat side, hold the carrot firmly in one hand, pressing it against the cutting board. Ensure your grip is secure but comfortable.
-
Position the Peeler: Hold the julienne peeler firmly in your dominant hand. Position the blade at one end of the carrot, with the serrated edge facing down and angled slightly towards the carrot’s surface.
-
Initiate the First Strip: With gentle, consistent pressure, drag the peeler along the entire length of the carrot, moving away from your body. You’ll see several delicate, matchstick-like strips emerge from the blade. Let the sharp teeth do the work; there’s no need to press too hard.
-
Repeat and Rotate: Continue dragging the peeler down the carrot, making parallel passes. After each pass, rotate the carrot slightly (if working on a round carrot) or move to the next flat section. This ensures you utilize as much of the carrot as possible and create consistent strips from all sides.
-
Dealing with the Core: As you continue, the carrot will become thinner. Eventually, it will be too thin to safely create long, even julienne strips. At this point, set aside the remaining core for other uses, like stocks, soups, or even snacking. Do not attempt to force the peeler on a very thin piece, as this can be unsafe.
Remember, practice makes perfect. The more you use your julienne peeler, the more intuitive the motion will become, and the more uniform your carrot strings will be.
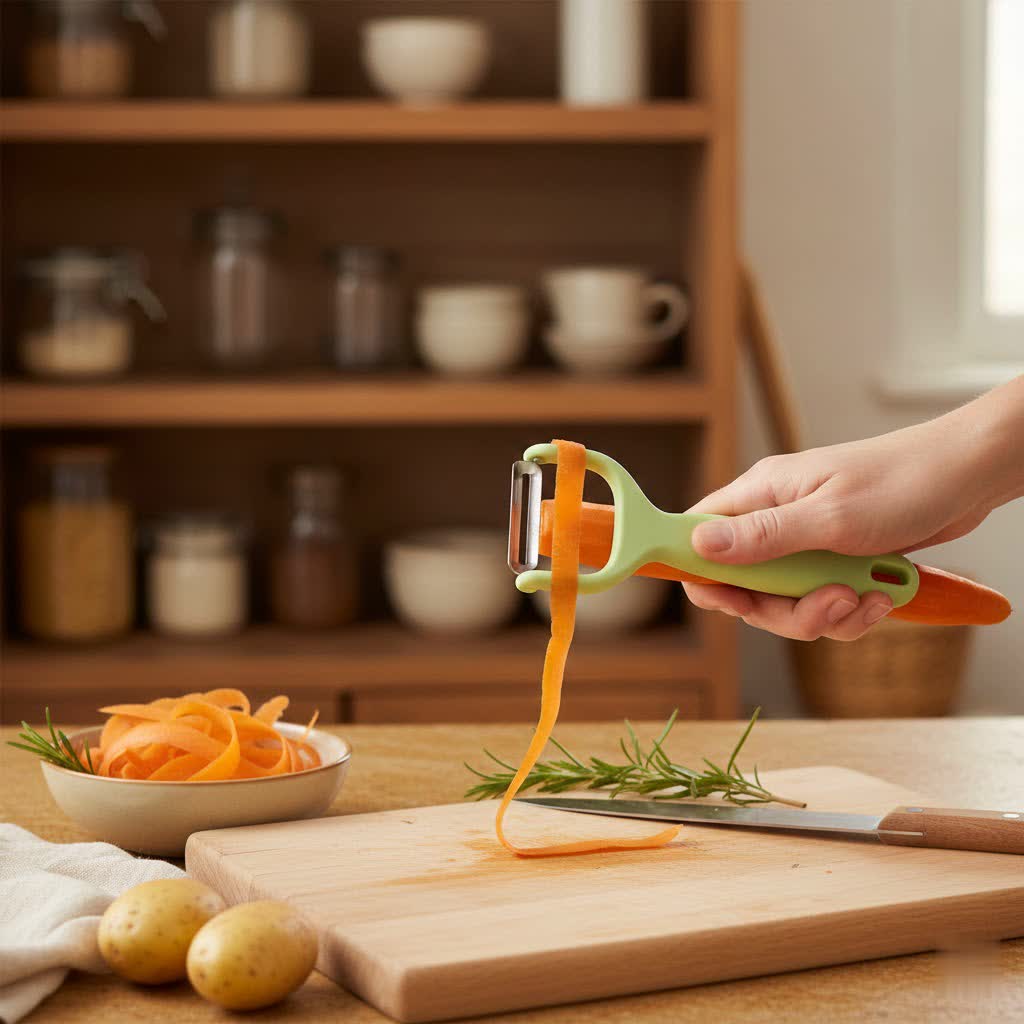
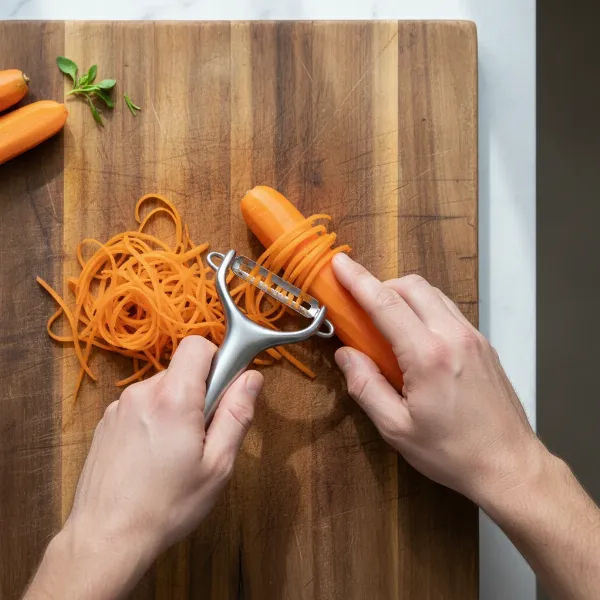 A hand demonstrates how to use a julienne peeler on a carrot to create uniform strings on a cutting board.
Tips and Tricks for Flawless Carrot Strings
To truly master the art of julienning carrots, keep these expert tips in mind:
- Consistent Pressure is Key: Avoid applying uneven pressure. Too much force can lead to thicker, uneven strips or even snagging the blade, while too little pressure might result in incomplete cuts. A light, steady hand allows the peeler’s sharp teeth to do their job flawlessly.
- Work on a Stable Surface: Always use your julienne peeler on a secure cutting board. This provides leverage and prevents the carrot from shifting, which is crucial for safety and consistent results. Trying to julienne a carrot freehand can be tricky and lead to uneven strips or accidental nicks.
- Keep Fingers Clear: The blades are sharp. Always be mindful of your fingers, especially as the carrot becomes smaller. Using the flat-base method described earlier significantly improves safety by keeping your holding hand further from the blade.
- Manage Different Carrot Sizes: If you have very long carrots, you might find it easier to cut them in half crosswise before julienning. This makes them more manageable and easier to handle, especially if your cutting board space is limited.
- Embrace the “Ribbons” First: For extra-long, delicate strings, sometimes it helps to use a regular peeler to create wide, thin ribbons first, then run your julienne peeler across those ribbons. This can be a technique for specific presentations, though generally, julienning directly is sufficient.
By incorporating these simple yet effective tips, you’ll find yourself creating restaurant-quality carrot strings with confidence and ease.
Beyond Carrots: Other Uses for Your Julienne Peeler
While our focus today is on carrot strings, the versatility of a julienne peeler extends far beyond this vibrant root vegetable. Once you’re comfortable with the technique, you’ll discover a world of other ingredients that benefit from its precise touch.
Imagine creating delicate ribbons of zucchini for “zoodles” in a light pasta dish or cucumber for refreshing salads and spring rolls. It’s also fantastic for garnishing dishes with thin strips of sweet potatoes or even tough-to-chop ginger for stir-fries and marinades. For a delightful dessert garnish, you can even julienne apples or firm pears. This single tool quickly transforms everyday ingredients into visually appealing components, adding texture and elegance to countless recipes. The possibilities are truly endless, making your julienne peeler an indispensable multi-tasker in the kitchen.
Choosing the Right Julienne Peeler
Selecting the best julienne peeler can make a significant difference in your experience and the quality of your carrot strings. With many options on the market, here’s what to look for based on my extensive experience:
- Blade Material: Always opt for high-quality stainless steel blades. Stainless steel is durable, resists rust, and maintains its sharpness over time, which is crucial for consistent, clean cuts. Some may offer ceramic, but stainless steel tends to be more robust for root vegetables.
- Handle Design: An ergonomic, non-slip handle is paramount for safety and comfort. Look for designs that fit well in your hand, provide a secure grip even when wet, and prevent fatigue during extended use. Y-shaped peelers, like the popular OXO Good Grips Julienne Y-Peeler, are often praised for their comfortable handles and control.
- Durability and Longevity: Invest in a peeler from a reputable brand known for kitchen tools. A well-made julienne peeler will be a durable addition to your kitchen arsenal, standing up to years of regular use.
- Ease of Cleaning: Consider peelers that are easy to clean. Many stainless steel models are dishwasher-safe, which is a major convenience.
> “A julienne peeler isn’t just about speed; it’s about consistency and elevating the visual appeal of your dishes with minimal effort. Investing in a good one is investing in your culinary confidence.” – Chef Anya Sharma, Culinary Arts Instructor
Cleaning and Maintaining Your Julienne Peeler
Proper care ensures your julienne peeler remains sharp, hygienic, and ready for its next task. After each use, it’s best to clean your peeler immediately. Food particles, especially starchy carrot residue, can get lodged between the blade teeth and harden, making them difficult to remove later.
Rinse the peeler under running water, using a small brush (like a dedicated vegetable brush or even an old toothbrush) to gently dislodge any trapped bits. Be cautious of the sharp blade. Many modern julienne peelers, particularly those with stainless steel blades, are dishwasher-safe, offering a convenient cleaning option. However, hand washing can prolong the blade’s sharpness.
Once clean, dry your peeler thoroughly to prevent water spots and rust. Store it in a utensil drawer where the blade is protected and won’t snag other tools or pose a risk when reaching in. With a little care, your julienne peeler will continue to produce perfect carrot strings for countless meals to come.
Conclusion
Mastering the julienne peeler for carrot strings is a simple skill that delivers significant culinary rewards. By choosing the right tool, preparing your carrots properly, and employing a few straightforward techniques, you can effortlessly create uniform, delicate matchsticks that enhance the texture and presentation of any dish. This seemingly small gadget can transform your kitchen experience, making vegetable preparation faster, safer, and more enjoyable. So, why settle for uneven, labor-intensive knife cuts when a julienne peeler offers a world of consistent, elegant results?
Are you ready to elevate your home cooking and impress your guests with perfectly julienned carrots?
Frequently Asked Questions
What is the difference between a julienne peeler and a regular peeler?
|
Our Picks for the Best Peeler in 2026
As an Amazon Associate I earn from qualifying purchases.
|
||
| Num | Product | Action |
|---|---|---|
| 1 | TACGEA Vegetable Peeler for Kitchen, Potato Peelers for Fruit Straight Blade, Durable Non-Slip Handle, Set of 2 |

|
| 2 | KitchenAid Classic Euro Peeler, 8.6 inches, Black |
|
| 3 | OXO Good Grips Y-Peeler |
|
| 4 | OXO Good Grips Swivel Peeler |
|
| 5 | Spring Chef Premium Swivel Vegetable Peeler, Soft Grip Handle and Ultra Sharp Stainless Steel Blades - Perfect Kitchen Peeler For Veggie, Fruit, Potato, Carrot, Apple - Black |
|
| 6 | Kuhn Rikon Original Swiss Peeler 3-Pack Red/Green/Yellow |
|
| 7 | Rainspire Vegetable Peeler Potato Peelers for Kitchen, Sharp Stainless Steel Blades Veggie, Comfortable Handle Fruit Peeler, Carrot Peeler Apple Peeler Dishwasher Safe Black, 1-Pack |
|
| 8 | 2PCS Premium Vegetable Peeler with Wooden Handle and Bottle Opener, Multi-Functional Vegetable Peeler, Stainless Steel Blade Kitchen Tool for Fruit |
|
| 9 | Linden Sweden Original Jonas Vegetable Peeler - Rust Resistant Silver Carrot and Potato Peeler with Ergonomic Handle for Safety and Control - Dishwasher Safe and Compact - Made In Sweden - 6.5in |
|
| 10 | FUHUY Vegetable, Apple Peelers for kitchen, Fruit, Carrot, Veggie, Potatoes Peeler, Y-Shaped and I-Shaped Stainless Steel Peelers, with Ergonomic Non-Slip Handle & Sharp Blade, Good Sturdy (2PCS) |
|
A regular peeler has a single, flat blade for removing vegetable skins. A julienne peeler features multiple small, serrated blades designed to cut firm vegetables into thin, matchstick-like strips, without removing the entire outer layer like a standard peeler.
Can I use a julienne peeler on other vegetables besides carrots?
Absolutely! Julienne peelers are incredibly versatile. They work wonderfully on firm vegetables such as zucchini, cucumbers, sweet potatoes, radishes, and even ginger, allowing you to create uniform strips for various culinary applications.
Is a julienne peeler safer than a mandoline for making carrot strings?
For many home cooks, a julienne peeler is considered safer than a mandoline slicer, especially for small tasks like making carrot strings. Mandolines can be very sharp and require careful handling, whereas a handheld peeler offers more direct control.
How do I get long, even carrot strings?
To achieve long, even carrot strings, start with a straight, medium-to-large carrot. Peel it first, then consider cutting a thin slice off one side to create a flat base. Use consistent, light pressure and smooth strokes from one end of the carrot to the other, rotating the carrot after each pass.
How do I clean a julienne peeler effectively?
After use, immediately rinse your julienne peeler under running water. Use a small brush to dislodge any food particles stuck between the teeth. Most stainless steel julienne peelers are dishwasher-safe, but hand washing and thorough drying are recommended to maintain blade sharpness and prevent rust.